Once a year, I test restoring a server to a desktop. The server is backed up with standard Windows Backup. The idea is to confirm that if the server went down, I could quickly restore to one of the customer’s desktops as a temporary solution while the server is repaired or replaced. This is also an interesting test of how well Windows Backup handles restoring to different hardware. Previous tests are blogged in 2011, 2012, 2013, 2014, 2015, 2016, 2017 (which includes 2018), and 2020 (which tested Veeam restore instead of Windows server backup).
This year, I’m creating a new post by editing the 2017 edition. New this year is the source (Server 2016 Essentials running on a Dell T30 server) and the target (a Lenovo M920s desktop). It’s been several days since I completed the restore so I hope I can remember what changed!
A Few Notes
Issue #1: Legacy BIOS
After you unlock the BitLocker drive and go through all the steps to start a restore, you may get this message “Windows cannot restore a system image to a computer that has different firmware”:
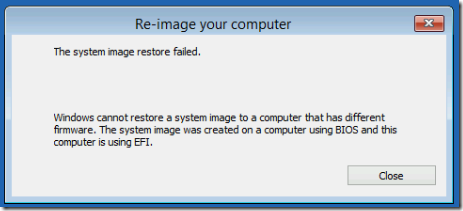
This year, I set the desktop to Legacy First in advance, so I did not see this message.
Issue #2: USB vs DVD Media
In previous years, I had trouble booting from USB, so I recommended booting from DVD. This year, no DVD was available (maybe the Server 2016 Essentials media is too big for DVD?). I did run into a problem when I booted from the USB’s “Legacy” option—seems like I couldn’t unlock the Bitlocker-protected backup drive? In any case, counter-intuitively, once I booted the USB from the second UEFI option, it worked. (I wonder if one was 32-bit and one was 64-bit?)
Issue #3: Confusing Backup Message
Pretty sure this happened again this year: “At backup time, you had backed up only selected files from volume D:. If you proceed, only those specific files and folders that were backed up would be recovered.”
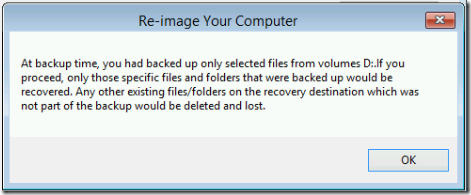
I concluded that this just means some files were excluded when I backed up D (in this case, the WSUS repository), so they will not be available after the restore.
Issue #4: Missing Drivers
New this year, the Server 2016 installation media did not have drivers for this new desktop purchased in 2020. After booting the restored server, several devices were missing, including the Ethernet Controller:
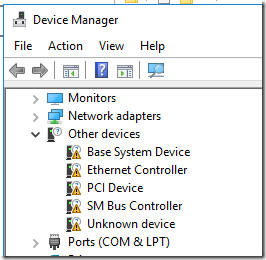
It would be helpful to copy current drivers from the Lenovo support site for the M920s model 10JS to the USB installation media in advance.. Even though these are Windows 10 drivers, they worked under Server 2016:
- Base System: Intel Chipset Driver for Windows 10 (64-bit)
- Ethernet Controller: Intel LAN Driver for Windows 10
After installing those two drivers, there was still a missing driver (was it the “Unknown device”?), but I was able to complete the connectivity testing.
What You’ll Need
Gather these tools before you start:
- Server 2016 Essentials bootable USB. See Issue #1 above about why to avoid USB media.
- An external CD/DVD drive. The internal drives, rarely used, often seem to fail.
- A bare hard drive equal to or greater than the size of the drives backed up from the server. (If you need to do a split restore across multiple drives, you’ll have to use the command line; see 2016.)
- Snacks. This always takes longer than you think!
Prepare for Restore
This year we’re again restoring to a Lenovo M920s (model 10SJ). I removed its built-in NVMe drive (which was stuck in there pretty good) and installed a blank 512GB SSD for this test. This allows automated restore and you don’t have to restore the desktop at the end; you just re-install the desktop’s drive. (In a real disaster scenario, if the reason that the server is dead is due to a hard drive failure, you might be able to use your spare hard drive directly in the server.)
Restore to the Desktop
1. Set the desktop’s BIOS to match the server’s, in this case Legacy First.
2. Plug in the external backup drive from which you’ll be restoring. Use a USB3 cable. Turn it on. (Yes, obvious, but when you forget, you have to start over!)
3. Insert the bootable Server 2016 Essentials USB. Boot the desktop from the USB media, choosing the second UEFI option (see Issue #2 above).
4. Choose Repair your computer > Troubleshoot > Command Prompt. Unlock the external BitLocker drive if prompted, even though you don’t need it yet.
5. Use these commands to clear the temporary internal disk:
diskpart (determine which disk number is the internal drive)
list disk
sel disk 0 (choose the drive you want to clear, not the backup source drive!)
clean

exit
6. Type exit again to exit the command prompt, then go back to Troubleshoot > System Image Recovery. Unlock the BitLocker drive if you haven’t already. Accept the defaults to restore from the main system image on the disk. Allow it to partition the target disk. Restore all drives, not just the system drives. If it complains about only having drive D: on the media, you can probably ignore it—see Issue #3 above. At the end, choose Advanced and uncheck the Reboot when finished option—in case you aren’t there when it finishes, you want the chance to turn off the live server before booting the new one.
Start the restore. This year, it took less than half an hour to restore C: and D:.
Prepare to Boot
It would be nice to use the router to reconfigure the server and desktop IP addresses. This year, my UniFi controller wasn’t accepting static IP changes promptly, so I unknowingly (but successfully) completed the testing just by changed the static IP inside the restored server.
1. On the router, change the server’s IP reservation to a temporary IP, e.g. one ending in .99. (Even though the server has a fixed IP, I set up a DHCP reservation in the router because it also has vPro, which uses DHCP when the server is not on.) Change the desktop’s IP reservation to the server’s, in this case ending in .2.
2. On the router, delete the server’s and desktop’s old DHCP leases. On a UniFi USG, in the Controller, that should be possible from the Insights tab. Hover over a device and choose Forget in the far right of the line.
3. On the live server, open Network Connections (ncpa.cpl) and disable its network adapter. There is no need to shut down the server.
4. Boot the restored desktop. The first boot takes a while as Windows re-assigns hardware etc. This year, it was maybe five or ten minutes.
Logon and Fixing the Network Adapter
Once booted, of particular importance is the new network adapter—the OS no longer sees the server’s network adapter, so the static IP assigned there is not active.
1. Log on, right-click on the network icon in the System Tray, click Open Network and Sharing Center, then Change adapter settings. (Or Start > ncpa.cpl.) New this year, there were no adapters listed: the Server 2016 install did not have a driver for the desktop’s Intel I219-LM network adapter.
See Issue #4 above. Install the network and base system drivers from the USB stick and reboot as necessary.
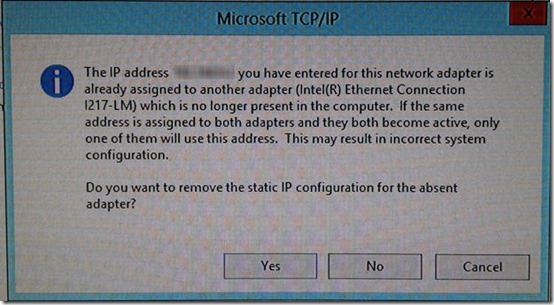
Back in the Adapter settings, assign the same static IPv4 address as was used by the live server. As a domain controller, the sole DNS entry should also be the local static IP. A message appears that another adapter which is no longer present in the computer has that address. Click Yes to remove he static IP configuration for the absent adapter.
Important For some reason, removing the static IP of the absent adapter removes the gateway configuration. Go back in and make sure that a gateway is defined, pointing to the router. You may need to re-check the gateway after a reboot.
2. If you have data that is backed up directly, for example using RoboCopy, restore that data by copying from the external drive.
3. Reboot the system. This should go more quickly as the system is now happy to have all its drives back and its network card properly configured.
You can disconnect the backup drive. In a real disaster recovery scenario, attach another drive to use for backups.
Test the System
1. Check Event Viewer > Administrative Events.
2. Check that the web server works. (May need to test from outside network using a remote connection to another site.)
3. Check that Active directory works, including accepting a logon from a client and updating group policy (gpupdate).
4. Check that shared drives are available from a client. Try opening files on a network share.
5. Print a page to a network printer shared via the server.
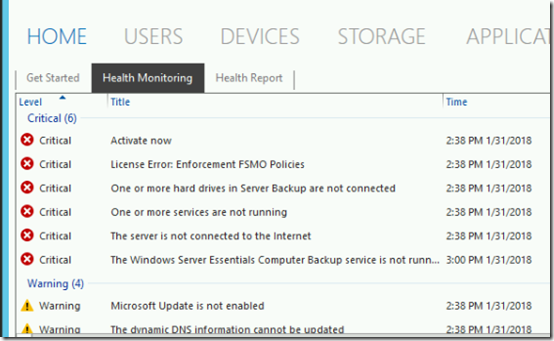
6. If you’re running the Essentials edition, review the Critical Errors in the Essentials dashboard. You may initially see several errors including licensing errors:
Under Health Monitoring Tasks, choose Refresh. Most of the errors should go away. The remaining errors indicate that some hard drives are not connected and that the Client Computer Backup service is not running. These errors are expected.
7. Also for Essentials, under Home > Health Report, choose Generate a Health Report. Review the report. This also sends an email, testing outbound email flow.
At this point, I encountered something I’d hit in 2020: the Windows Server Essentials Management service would not start. Again, following a comment in this thread, I ran wbadmin delete catalog at an Administrative command and I was able to start the Windows Server Essentials Management service, which allowed me to generate and send health reports.
8. In Computer Properties, check that Windows shows as activated.
Testing is now complete. In a true disaster recovery scenario, users could resume work now.
Re-Activate Live Server
1. Reverse the changes you made in the router: set the desktop’s MAC address to point to the desktop’s IP and the server’s MAC to point to the server’s IP. If you can, delete the current DHCP leases for both.
2. Shut down the test server running on the desktop.
3. On the live server, enable the network adapter that you previously disabled.
Reassemble the Desktop
Assuming you did your restore to a temporary drive, swap back in the desktop’s real drive and you should be good to go.
Wipe the Temporary Drive
This turned out to be a challenge in itself. Although the drive is a Samsung, after putting it back in its original device (a Lenovo TS140 server), and after creating and booting from the Samsung Magician secure erase media, I kept getting an “error 30” message: “Secure erase not supported on selected SSD”. Briefly disconnecting and re-connecting the SSD’s power cable (to bypass any BIOS security restriction) did not help. In the end, I simply enable BitLocker on the drive’s two partitions, then deleted the partitions and used diskpart to clean the drive.

