Man it is hard to restore a computer backup from a Windows Backup image. Especially if you are trying to restore to a new Hyper-V virtual machine. Here are a few of the hurdles to overcome.
Allow Accessing the Backup
Select the Properties of the WindowsImageBackup folder, Advanced, take ownership (with the logged-in user, for example) of that folder. Force inheritance to subfolders.
Make the Image Accessible
It’s pretty easy to create a Hyper-V virtual machine and, if you have an ISO of the Windows installation media, to boot it from that media, click Repair your computer, and start the System Image Restore wizard. But how will the VM see the backup files? I had them on a NAS but the restore wizard could never see the files. Maybe if I had created a Legacy Network Adapter for the VM, it would have worked. In the end, I created a second virtual hard disk, mounted it, copied the WindowsImageBackup files into it, and attached it to the VM. This allowed the restore wizard to see it as a locally-attached drive.
Use the Right Virtual Machine Type
I initially created a Type 1 virtual machine, but the restore complained that it could not restore an EFI machine to a BIOS-based computer. Creating a Type 2 virtual machine fixed that.
Make the Target Disk Big Enough
I’m not sure this was actually a problem, but at some point I increased the size of the target disk from the default 127GB to 500GB, the (probable) size of the physical hard drive that was in the original machine. The restore actually re-created all the partitions that were there, including a large Backup partition, though it didn’t restore that.
Use the Right Windows Version
I thought I was restoring a Windows 10 machine but when it kept failing, I thought I’d check. From within Disk Manager I mounted the actual backup image (the largest vhdx in the backup folder), then checked the Properties of \Windows\System32\cmd.exe. The Details tab said it is version 6.3.9600. From the handy list in this thread, I realized I was restoring Windows 8.1:
Win8.1 = 6.3.9600
Win10 Original Release = 10.0.10240
Win10 1511 (November Update) = 10.0.10586
Win10 1607 (Anniversary) = 10.0.14393
Win10 1703 (Creators) = 10.0.15063
So I loaded a Windows 8.1 ISO instead.
0x80042412 – Pre-Format the Drive
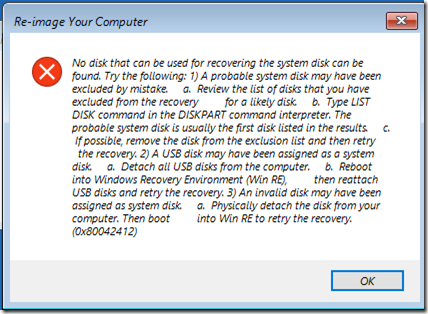
The most annoying error was this monster:

Using diskpart to clean the target disk didn’t help; in fact, it always told me I had to reboot after that (to initialize the disk?).
This came up with both the Windows 10 and Windows 8.1 restore media. Finally I came across some instructions from bbscool here that got me past that.
Basically what you have to do is clean the target disk with diskpart, then start a full Windows installation. Fortunately I had an old 8.1 product key available that got me past the first screen. (Windows 10 lets you bypass the key and choose a version.) First choose Custom: Install Windows only (advanced). Chose to install in Drive 0 Unallocated space (making sure that’s the right disk). Click Next and when it starts installing, immediately click the red X in the upper right corner to cancel the install. If you go back in to diskpart, you should now see that the disk has been formatted with the appropriate system partitions etc. (a total of four partitions for Windows 8, three for Windows 10). NOW go back and run the image restore wizard. It will see the pre-formatted disk and happily restore your system image there.
