The installation ISO for Server 2016 is about 5.8GB, so it won’t fit on a a standard DVD. I needed to create a USB drive that would boot with the BIOS in UEFI mode.
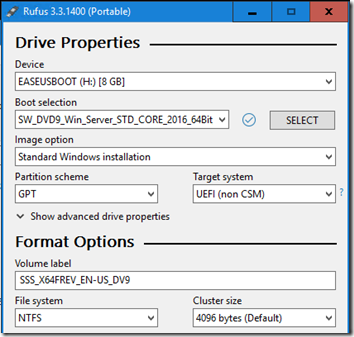
I created the initial USB thumb drive using Rufus and the default GPT/UEFI/NTFS options:
Unfortunately when booting from this drive, I got the message, “Operating System Loader has no signature. Incompatible with SecureBoot”:
After some hunting around, I found the Rufus author explaining here and here that his custom UEFI loader (which loads from a small FAT32 partition) isn’t signed by Microsoft and therefore you must temporarily disable Secure Boot until your OS is installed.
I wasn’t really worried about disabling Secure Boot for installation—as he says, if you trust the media, it should be okay. However, it felt like a challenge to see if it really must be disabled. And no, it doesn’t have to be.
Update February 10, 2022
With Rufus 3.17, this workaround is no longer necessary. As explained here and here:
You should no longer have to disable Secure Boot if you use Rufus 3.17 or later, as the UEFI:NTFS bootloaders being used by these versions are Secure Boot signed.
In a brief test, I can confirm UEFI boot worked without the procedure below.
Secure-Bootable USB, the Semi-Manual Way
Option #2 of this TechNet article presents the main principle: your USB drive needs a FAT32 partition with the boot files and an NTFS partition with the rest of the installation media (which may include files that exceed the FAT32 4GB size limit).
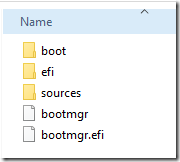
This article is the real gem: it lists the files and folders that must be copied to the FAT32 partition:
boot
efi
sources – only the boot.wim file
bootmgr
bootmgr.efi

Rather than start from scratch (*), I used a little trick to convert the Rufus USB drive to a secure-bootable USB drive: I ran Disk Management, shrank the NTFS partition by 2GB (although 400MB would have been enough), created a FAT32 partition in the free space, then copied over the files listed above.
You can’t even see the Rufus FAT partition here; it shows as 0 bytes in Disk Management. Fortunately, it seems that our larger FAT32 partition is before the Rufus partition. According to the explanation of how Rufus works, “When the USB drive boots in UEFI mode, the first NTFS partition gets ignored by the UEFI firmware … and the UEFI:NTFS bootloader from the bootable FAT partition is executed.” Since our FAT32 partition precedes the Rufus FAT partition, it is loaded first and the Microsoft-signed boot files are loaded:
(At first I used the BIOS to specifically choose \EFI\Boot\bootx64.efi from the new the FAT32 partition, but now I see it probably would happen automatically by just leaving the root thumb drive selected as the boot source.)
(*) Note If you do want to partition the USB drive from scratch, be sure you’re on Windows 10 1709 or later. Earlier versions only see the first partition of removable drives. (See this article: https://borncity.com/win/2017/04/22/windows-10-version-1703-usb-stick-multi-partition-support/.)


You are the real mvp, thanks a lot, worked for me
This method does not work.