Here’s how I set up a new Lenovo TS140 Server with eDrive enabled on a Samsung 840 EVO SSD. eDrive will be managed by BitLocker under Server 2012 R2.
Note This article looks long but it’s mostly screen shots!
Prepare the Server
1. Update to the latest BIOS (currently 82A) using the DOS method.
2. In BIOS, enable TPM (Security > TCG Feature Setup > TCG Security Feature: Active).
3. As best I can tell from this thread and this one, eDrive won’t work with Intel RAID enabled, even if it’s just passing through SATA. So in BIOS, enable AHCI only (Devices > ATA Drive Setup > Configure SATA as).
4. In BIOS, enable OS Optimized Defaults. This is oddly on the Exit screen > OS Optimized Defaults. This affects CSM Support, Boot mode, boot Priority, Secure Boot, and Secure RollBack Prevention.
Prepare the SSD
1. We need to enable the 840’s Encrypted Drive feature before installing Windows. Download the latest Samsung Magician software (currently 4.4). Install it on a computer that is already set up. I used a Windows 7 x64 machine.
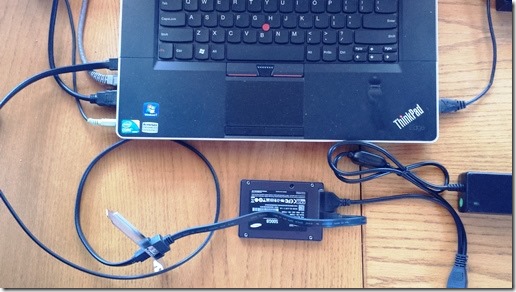
2. Attach the 840 EVO to the machine with Samsung Magician and run the software. I tried two USB-to-SATA bridge products, but they would not let Magician see the drive in native mode (only the Performance Benchmark feature was available). However, Magician did see the drive once connected (rather awkwardly) as eSATA to my laptop:
Note The computer running Samsung Magician must be online else you will see the message, “This Drive is Not Supported”. From this thread: “Magician needs to contact the Samsung server to authenticate the drive.”
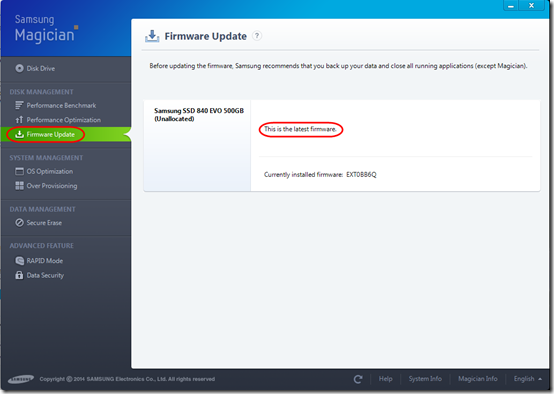
3. Once Magician recognizes the drive, confirm that the drive has the latest firmware. If not, update it. The firmware version can also be downloaded here.
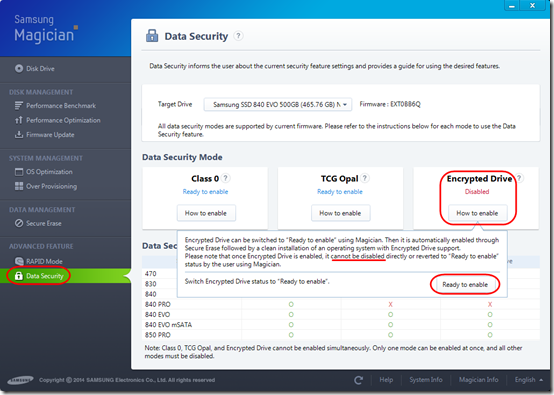
4. Under Data Security, set Encrypted Drive support to Ready to enable. You are warned that once enabled (by Windows), this cannot be disabled.
This helpful AnandTech thread goes into more detail about enabling this feature, and includes a link to an unsupported program to do a “PSID Revert” on the drive. I downloaded a copy of that program in case I need to secure wipe this drive before disposal a few years from now.
The drive is now Ready to enable:
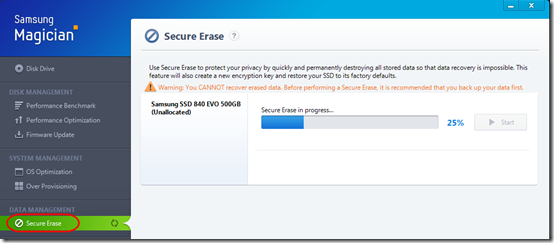
5. The message said the drive should be secure erased. It may not be necessary here, since it has never been used, but it shouldn’t hurt:
Note Sadly, in a later version of Samsung Magician (5.2.1), even though the Samsung SSD was attached as a secondary drive, I had to create a bootable USB to do the secure erase. Creating the drive goes pretty fast—it’s just a small Linux OS with a command-line interface. On my first erase attempt, it told me that the Samsung SSD drive was “locked,” so I disconnected the power connector for a few seconds, as instructed. After that, the secure erase proceeded properly.
The drive is ready for eDrive. Safely eject it from your setup computer and install it in the TS140.
Install Windows and Turn On BitLocker
Note The first time I did this, I partitioned the drive after installing Windows but before turning on BitLocker. BitLocker did not activate in hardware encryption mode (it prompted me for whether it should encrypt the whole drive or just the current data). These modified instructions reflect what worked the second time through.
According to this TechNet article, to use eDrive for a startup (boot) device, “The drive must be in an uninitialized state.” I figured if I used the ThinkServer EasySetup utility that came with the server, it would probably initialize the drive, maybe install a utility partition. So I skipped that and installed Windows Server 2012 R2 directly from downloaded volume license media. The media includes the April 2, 2014 Update (KB2919355).
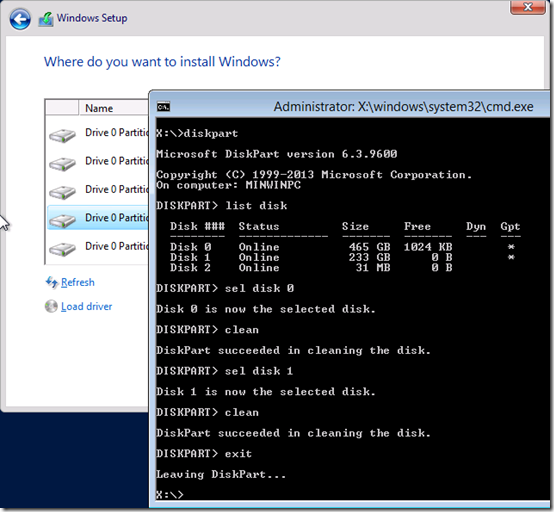
1. Install Windows. When you get to the drive partition screen, press Shift-F10 to get a command prompt. Use diskpart to clean the drive. This might not be necessary on a brand new drive but it doesn’t take long, so I’d recommend it anyway. I also cleaned the second, magnetic drive in this system:
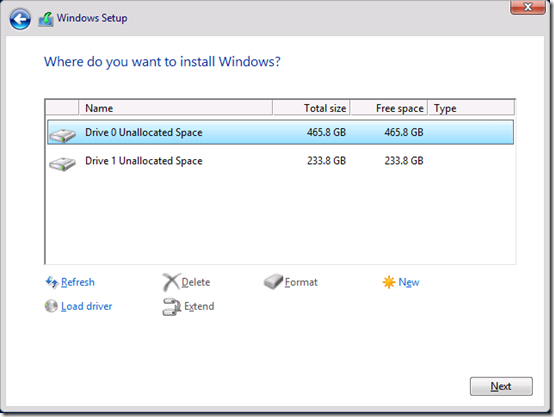
2. According to the Lenovo staff member “someotherguy” on January 27, 2014 in this thread, “Key step seems to be booting setup DVD after the SSD is already wiped.” So power down the machine, then boot back to the Windows install DVD. Install Windows into “Unallocated space” (do not try partitioning your drive here).
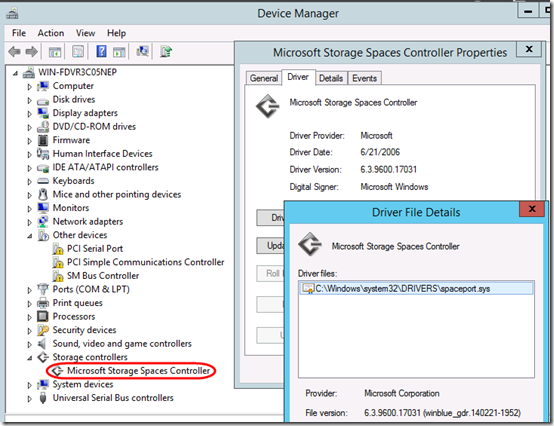
3. When the install completes, confirm that are using the right storage controller driver. I expected to see a Microsoft AHCI driver, but instead found a “Storage Spaces Controller” driver by Microsoft:
Note that at this point I have not installed any Windows updates or Lenovo or Intel drivers.
4. Install Samsung Magician. Under Data Security, it reports that Encrypted Drive is enabled, even though BitLocker is not yet enabled:
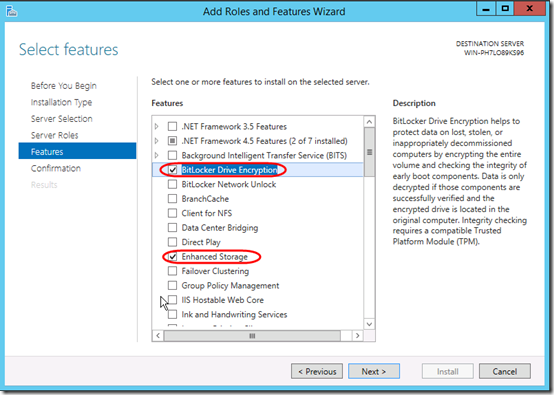
5. Install the BitLocker feature. Note that Enhanced Storage is also installed. According to TechNet, “This feature enables support for Encrypted Hard Drives on capable systems.” Sounds promising….
6. After rebooting, from the Start screen, run Manage BitLocker. I got this error:
I rebooted again, closed Server Manager, and was able to start BitLocker management.
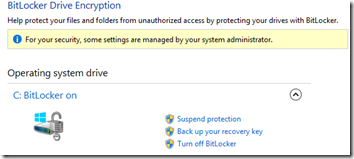
7. Turn on BitLocker for drive C:. It did not ask me if I wanted to encrypt the whole disk or just the data. I saved the key to a USB drive. I chose to let it restart to confirm that it could store and and retrieve the key from the TPM. After the restart, BitLocker shows as on:
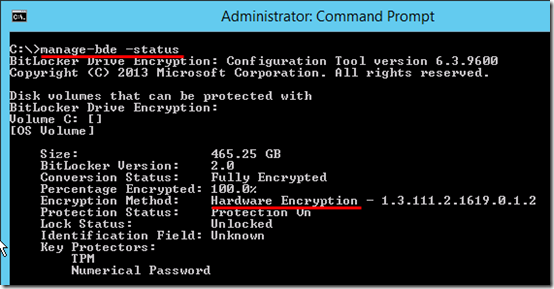
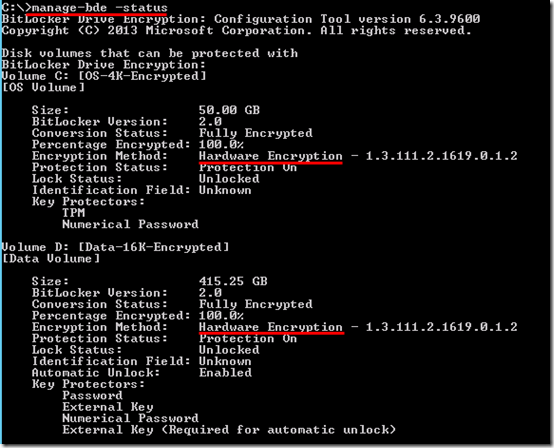
8. Run manage-bde -status to confirm we got hardware encryption:
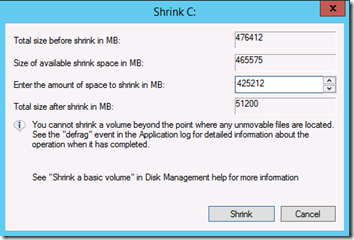
9. Now, open Disk Management, shrink the primary partition, and create a second partition:
It still shows BitLocker as active:
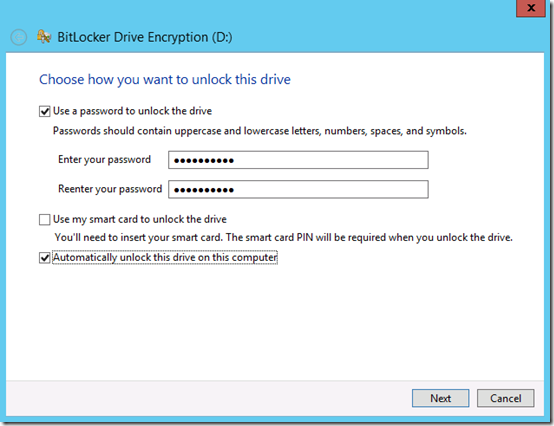
10. Turn on BitLocker on the second partition. This one asks for a password. Set it to automatically unlock so its key will be stored on the C: drive:
11. Run manage-bde -status again. Hardware encryption is active on both partitions that are stored on the SSD:
12. Proceed with the rest of your install but do not install the Intel RST driver! All threads I’ve read (like the January 28, 2014 post here by someotherguy) say that driver will not work with eDrive.
Intel Lynx Point
I got nervous when I installed the “Intel Lynx Point” chipset driver downloaded from the Lenovo site and saw that it include Intel AHCI:
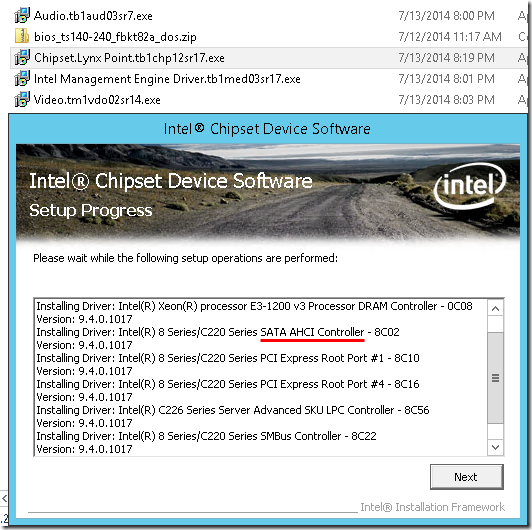
However after the mandatory reboot, BitLocker is still On and Hardware Encryption is active. Also, in Device Manager, the storage controller is still listed as Microsoft Storage Spaces Controller.
Bonus: Performance Benchmarks
Of course the main reason to use an SSD is for performance.
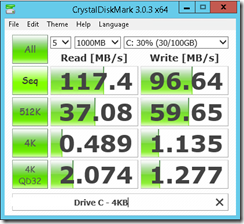
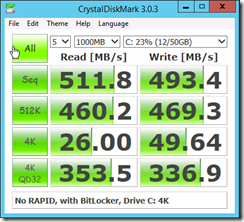
Here’s a benchmark of another Lenovo TS140 that is running two magnetic drives in a RAID 1 configuration:
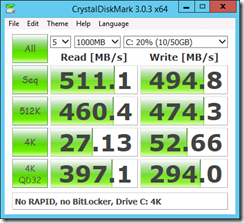
Here’s the new TS140 before enabling BitLocker:
And here are the almost identical numbers from the new TS140 with BitLocker enabled:
Note that I have not enabled RAPID mode on the Samsung 840 EVO, since RAPID uses system RAM and I expect to be a bit tight on that. I can probably live with 4-5 times faster performance than magnetic media!
Update 17 October 2016 – Notes on SSD Replacement
At one site where I had set up a 512GB Samsung Evo as an eDrive, they needed more space and decided to replace it with a 1TB SSD, leaving the old SSD in the server for use as a secondary drive.
I figured if I had any hope of getting hardware encryption to work on the new SSD, I would need to do an offline sector-level clone to the new SSD. I couldn’t get this to work:
- Samsung does not offer an offline clone program.
- GParted does not allow copying BitLocker-encrypted partitions.
- I had trouble getting Clonezilla Live CD to boot in the server.
- I could boot Clonezilla in a desktop, but it didn’t see the eDrive SSD.
In the end, I had to use Samsung’s online program. This actually worked well, even allowing me to resize partitions. However, hardware encryption did not get enabled on the the new SSD; its partitions had to be encrypted the old-fashioned way.
On the old SSD, I used a diskpart “clean” command to clear it, then re-initialized the disk and created an empty partition on the drive. Interestingly, when I turned on BitLocker on this partition, it does still use hardware encryption. So somehow that old SSD still knows it is in the same server.






Ok, what do I do if I have TWO 850 Pros with the TS140?
I want to mirror these drives using MS software RAID, but it seems without ATA password support I’m stuck using bitlocker and eDrive. Bitlocker won’t support dynamic drives and eDrive will only work to enable encryption on the drive I’m installing to.
I had hoped that I’d be able to enable hardware encryption on these drives and use them in a simple software RAID and bypass the limitation of bitlocker not being able to work on dynamic disks.
Why the heck do they limit things this way, key managment should be independent of the bios AND the OS.
Any suggestions?
Yeah you would think you could just get a simple program to manage hard drive keys e.g. from a bootable CD. So are dynamic drives required for MS software RAID? Wait, I thought the TS140 has built-in Intel RAID…could you use that, create basic disks, then use BitLocker in software-only mode? You give up a a little performance but not much. I’m actually doing this for RAID 1 with two 500GB spinning disks at one client.
Pingback: Self Encrypting Drives (SED) und Probleme mit gelöschten Bitlocker Partitionen | Das nie endende Chaos!