
The first article in this series, Getting Into VoIP, gave an overview of VoIP systems that I tested and why I chose to implement PBX in a Flash (PiaF). The next post, Setting Up PBX in a Flash, Part 1: Configuring a Virtual Machine talked about setting up PiaF under Microsoft Virtual Server. In this post, we’ll finish all the steps needed to complete our basic installation before configuring the PBX itself.
Completing the Generic Setup
These two steps will take us as far as we can go before we start entering information about our specific environment.
- Update PBX in a Flash by typing these two commands and following the prompts.
update-scripts
update-fixes - In part 1, we changed to the CentOS “vm” kernel. Zaptel is a kernel service and has not been compiled against this kernel, so it fails to load. You could compile it and get it to load, but in my environment, that still led to choppy voice and error messages, so I decided to simply disable it. (I don’t need the MeetMe conferencing and IAS trunking provided by Zaptel’s ztdummy driver.)
Zaptel normally starts when /etc/rc.d/rc3.d/S09zaptel calls the init script at /etc/rc.d/init.d/zaptel. To keep Zaptel from loading automatically, rename /etc/rc.d/init.d/zaptel to /etc/rc.d/init.d/zaptel.disabled. Note that this does not uninstall Zaptel, it keeps it from trying to loading at startup.
cd /etc/rc.d/init.d
mv zaptel zaptel.disabled
Optional: Adding Fax Capability
If you want your system to be able to send and receive faxes, this would be a good time to install the software. This Nerd Vittles article tells you all about it. All you need to do now is install the fax software by typing these commands:
cd /root

wget http://pbxinaflash.net/source/fax/fax.pbx

chmod +x fax.pbx

./fax.pbx
We’ll cover the FreePBX configuration in the Part 3.
Saving Your Setup
This is a great time to shutdown the CentOS machine (shutdown -h now), merge your undo disks, and make a backup of your virtual machine. This is the last snapshot opportunity before you start customizing the machine for your environment. That means that this is the virtual machine you would want to take with you if you started to do a new PBX installation at another location. You might call it “PiaF.2.With CentOS VM Kernel, Microsoft VM Additions, and Generic PiaF Updates.zip”.
Completing the Installation-Specific Setup
This section is really just a series of notes on Ward Mundy’s excellent “knol”, the Nerd Vittles Step-by-Step 1.3 Tutorial. I’ll use the same headings that he does to make it easier to match up. Note that these are the settings specific to my installation; you will need to adjust your settings accordingly.
Four Steps to Complete the Install
genzaptelconf. Not needed because we’ve disabled Zaptel, above.
IP address. I like controlling IP addresses on my network from a central location, namely my DHCP server, which is part of my router. So in Virtual Server, I set the virtual machine’s network card to use a static MAC address. Then I went into my router setup and told the router to always give out the same IP address to that MAC address. That way I can leave DHCP running on the client, but still have a “fixed” IP (or a DNS entry pointing to the IP) when configuring phones and ATAs.
Getting Rid of One-Way Audio
This is probably not needed since I won’t be using external VoIP providers right away, but it can’t hurt to set it now. My external IP is fixed, so I edited /etc/asterisk/sip_custom.conf to contain these two lines (adjust for your network):
externip=180.12.12.12
localnet=192.168.1.0/255.255.255.0
Then I rebooted (shutdown -r now). See Ward’s article if you need instructions on handling dynamic external IP addresses.
Getting Your System Up to Date
We already ran update-scripts and update-fixes above, so there is no need to do that here.
Activating Email Delivery of Voicemail Messages
I don’t use dynamic DNS, and I host my own mail and DNS servers, so my approach here deviates slightly from Ward’s. First, I decided to change the name of the Asterisk box from the default “pbx.local” to an actual name on my .local network. This post has detailed instructions. Here’s what I did:
nano -w /etc/hosts # Change the first line to read as follows:
127.0.0.1 mypbx.mydomain.local mypbx localhost.localdomain localhost
::1 localhost6.localdomain6 localhost6
nano -w /etc/sysconfig/network # Change the last line as shown:
NETWORKING=yes
NETWORKING_IPV6=no
HOSTNAME=mypbx.mydomain.local
shutdown -r now # Reboot to make sure changes are applied properly
cat /proc/sys/kernel/hostname # Check that this matches “mypbx.mydomain.local”
I also added mypbx to my DNS server. I set up an “A” record pointing to the IP that the router assigns, and I let DNS set up a reverse lookup record as well.
Send a test email:
echo "test" | mail -s testmessage [email protected]
At this point, mail is successfully traveling through my external Google Postini filter and my Exchange 2003 IMF filter, but Outlook 2007 is dropping it in the Junk E-mail folder. Run this command:
setup-mail
Enter “mypbx.mydomain.com” as the FQDN. Use “.com” so Postini can confirm the sending domain. (Later, in WebMin’s Sendmail configuration, I saw that this command configured “mypbx.mydomain.com” under Domain Masquerading.) A test message at this point sometimes goes to junk mail, sometimes not. We’ll make one more change to email, below, but first we must set up passwords and WebMin.
Setting Passwords and Other Stuff
Back in Part 1, I recommended using a simple password for root. This was to allow saving and even sharing the virtual machine image with different sites. Now it’s time to lock that down.
passwd # This is a Linux command that resets the root password. Make it a complex password this time!
passwd-master # This is a PiaF script. Follow the prompts to set the WebMin password to match root’s password, then create one password for maint, wwwadmin, and meetme. Although the script recommends using the root password, I chose to create a different, secure password here.
Use My Local SMTP Server
This is one item that is not covered in the Ward’s article. So far, mail is traveling from my PBX box to the offsite Google Postini filters, then back to my mail server and finally to my Inbox. I think that email sent by my own PiaF box can safely skip the Postini filtering process, so I want PiaF to relay mail directly to my SMTP (Exchange) server.
Log in to WebMin (http://mypbx.mydomain.local:9001), open Servers > Sendmail Mail Server, and click on Sendmail Options. Change the first option, “Send outgoing mail via host”, to your SMTP server’s name, e.g. “mailserver.mydomain.local”, then click on Save and Apply. That should relay mail through my SMTP server, avoiding Postini for local delivery. This time, a test message is delivered to my Inbox. Looking at its headers confirms that it was delivered locally without going through Postini.
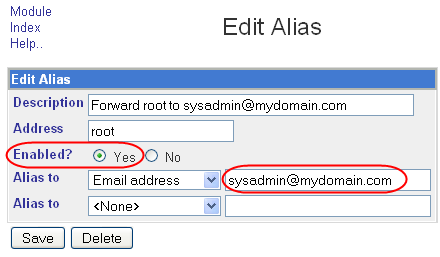
Update 2/17/2010: While you’re in the Sendmail configuration, take a moment to forward the root user’s mail to a legitimate email address. Once this is set up, you’ll start receiving a helpful daily “Logwatch” email summarizing system status and activity, including disk space.
In WebMin, from Servers > Sendmail Mail Server, click on Mail Aliases. In the lower right corner, click on the root user. Forward email to the administrative email address of your choice. Be sure to set Enabled = Yes before clicking on Save.
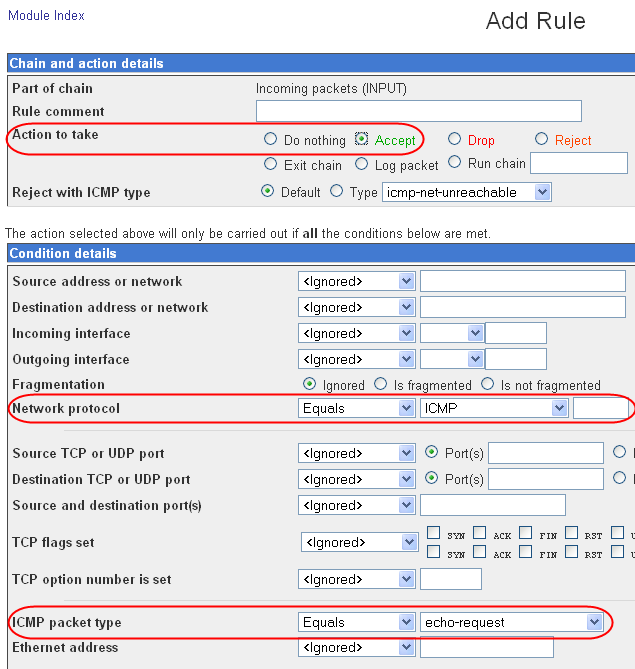
Update 10/12/2008: If you want your PBX to respond to ping requests, you can set that up now. This may be desirable if you have a server that runs monitoring software and needs to ping the PBX to see if it is running. Under WebMin, find the Linux Firewall. It may be under Networking or Un-used Modules. In the Add column, click on the down-arrow next to the rule “If protocol is ICMP and ICMP type is source-quench”. In the Add Rule screen, select “Network protocol” = “ICMP” and “ICMP packet type” = “echo-request”. At the top of the Add Rule screen, set the Action to Accept. If your PBX is open to the public Internet, you may want to use “Source address or network” to restrict the ping requests to your internal network.
Ready for Part 3
You might want to take another snapshot of your virtual machine at this point. Although this version is now specific to your installation, it’s a good fallback point in case you decide you want to start from scratch with part 3, the PBX configuration. Call it something like “PiaF.3.With installation-specific updates, before FreePBX configuration.zip”.
Then get ready to actually start configuring the PBX! Setting Up PBX in a Flash, Part 3: Configuring FreePBX is next.
Pingback: Find Largest Files on a Linux Machine | MCB Systems
Thanks for this, even if it is old at this point. I had never logged into that WebMin before so I am glad I came by this. Now my Asterisk box can send mail directly through my on-site Exchange server without having to leave my local network. Here’s the part that helped me:
Log in to WebMin (http://mypbx.mydomain.local:9001), open Servers > Sendmail Mail Server, and click on Sendmail Options. Change the first option, “Send outgoing mail via host”, to your SMTP server’s name, e.g. “mailserver.mydomain.local”, then click on Save and Apply. That should relay mail through my SMTP server, avoiding Postini for local delivery. This time, a test message is delivered to my Inbox. Looking at its headers confirms that it was delivered locally without going through Postini.