
I recently got a good eBay deal on a DRAC 5 remote access card for my Dell PowerEdge 2900 server.
Well it seemed like a good deal until I installed the card and got this message on bootup:
Remote Access Controller detected

!!*** Error: Remote Access Controller initialization failure***

RAC virtual USB devices may not be available...
According to the seller, the card was a “working pull,” but the box looked like it had been wrapped around a basketball during shipment, so who knows what it endured underway.
I spent an hour or so on the phone with Dell tech support and after confirming that the card was genuine, having me separately remove its two connector cables, and a few other tests, the rep concluded that the board was faulty. Flashing the ROM might help, but he checked the docs and confirmed that there is no way to flash the ROM if the card will not initialize. I was not looking forward to the lengthy USPS insurance claim process.
Read the Readme
I happened to be working with another DRAC 5 this week and needed to upgrade its firmware to version 1.51 so it would work with Internet Explorer 8 (on Windows 7).
Hey, what’s this in the Readme about “CONFIGURING THE RAC CARD FOR FLASH RECOVER MODE”? Wow it sounds complicated—console port redirection, serial connection, command line junk. But what have I got to lose? It’s worth a shot.
And it worked! After following the instructions, the DRAC initialized correctly and was accessible from Ctrl-E during boot and, once configured, from a web browser.
Update 01/07/2011: There’s a chance you can find out what’s wrong without going through the entire flash process. Once you have a COM connection, you should see some status information as soon as you turn on the server. See the last section of this article, “After the Recovery.”
Readme with Pictures
Here now the annotated readme in code font, with my comments in normal font:
1. Connect the RAC card to a TFTP server using a network cable to the system network or a cross-over cable to the host system.
I used a network cable connected to the network’s router.
2. Point the TFTP server root path to the folder containing the firmware update image, "firmimg.d5".
To get this file, download the “Hard Drive” install from Dell, f_drac5v151_A00.exe and extract it. I used the TFTP server on my Linux phone server. I blogged here about how to set up the TFTP server.
3. Using the BIOS setup screen, configure the system serial mux such that the RAC card is connected internally to the external DB-9 serial port.
Not as hard as it sounds. Just set the external serial port to point to the Remote Access Device (but see the Note below the picture):
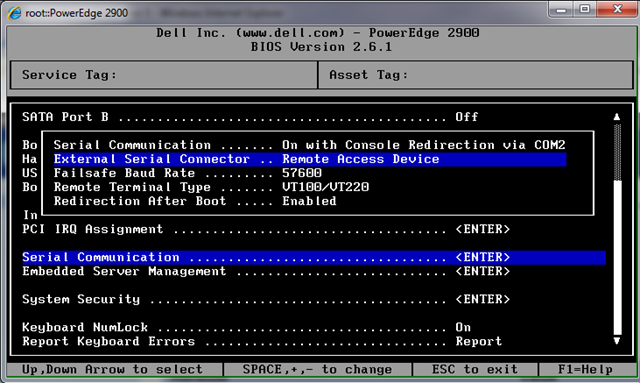
Note: I could not access the Setup (BIOS) while the DRAC was installed. I pressed F2 to enter Setup, and the Setup screen would flash by for half a second, but then Windows started loading immediately. To make the change shown above, I had to temporarily disconnect the DRAC 5 cable that gets power from the motherboard (can’t recall which one that is, but when the LEDs on the DRAC 5 go out, you’ve got it).
4. Install a NULL modem cable between the system DB-9 serial port and a client machine.
This made me nervous because as far as I know, all my serial cables are “regular,” not null modem. So I just used a regular DB9 serial cable. (Yes, this required digging through a box of stuff that’s ten or more years old!)
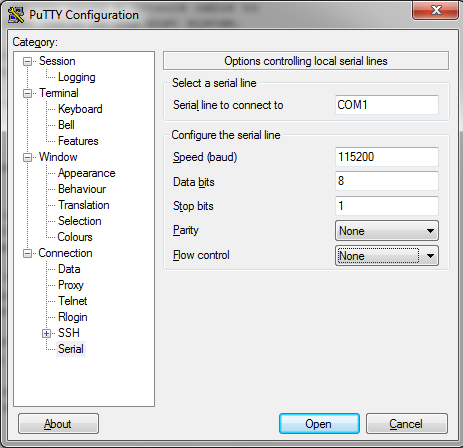
5. On the client machine, open a terminal communications program like "HyperTerminal" or "Mini-Comm" using, [1] baudrate=115200, [2] bits=8, [3] parity=none, and [4] flow control=none
Another “gotcha” because my client machine, a Lenovo T60p laptop in its docking station, is running Window 7, which no longer includes HyperTerminal. Fortunately PuTTY SSH, also on hand to manage the Linux phone server, works great as a serial port terminal program. I did have to go back in to the laptop’s BIOS to enable the COM port, probably disabled by default since it is only available through the docking station. Note to self: be sure to keep at least one machine around that has a good old COM port!
6. Enter a carriage return and a "RAC Recover Mode" prompt should appear. If not, then you may not be in recover mode. Recheck the serial mux and terminal settings.
Wow, it worked! Actually it says
RAC Recover>
7. View "recover network settings"

RAC Recover> recover getniccfg
This showed me that the default IP is something like 192.168.0.120.
8. If needed, set static network settings (DHCP is NOT supported in recover)

RAC Recover> recover setniccfg
<IPaddress> <Subnetmask> <Gateway>
I used this command to set the IP to an unused IP address on my local network.
9. Verify the settings and connection by pinging the TFTP server.

RAC Recover> recover ping
<tftp server ip>
(If ping does not work, you may need to enter recover racreset first).
Worked again! Note that you have to type the word “recover” before “ping”.
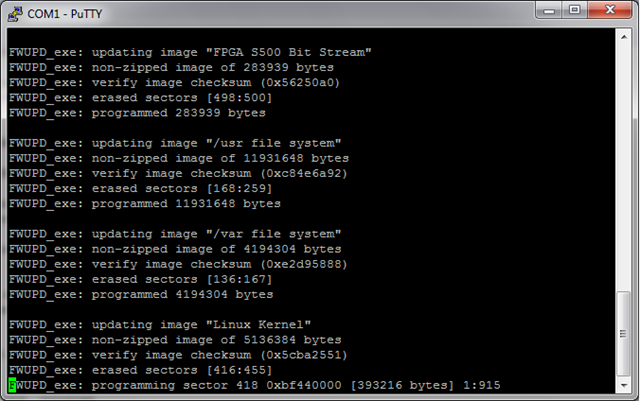
10. Download and update the flash part.

RAC Recover> recover fwupdate -g -a
<tftp server ip>
This took a while, but it provided some interesting messages during the install (unlike the Windows install, which goes silent for so long you wonder if it is stuck):
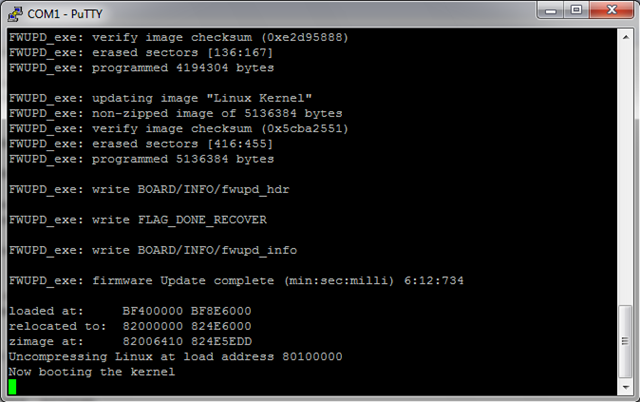
11. RAC card will now update and reboot on completion.
Which means it looks like this when it finishes:
After the Recovery
After the firmware was installed, I rebooted the machine (no more “initialization failure” message!), pressed Ctrl-E when prompted, and set up an IP address on my network (it had reverted to the default again). After that, I was able to log in to the DRAC via a web browser as usual, using the user root and the default password calvin.
Once the DRAC was functioning again, it was no longer possible to get to the RAC Recover> prompt. Pressing Return in the Putty session had no effect. Why not? Does the card somehow know when initialization is failing, and only allow recovery in that state? It was interesting, though, to see what happens as soon as you plug in the computer, before even turning it on. The DRAC initializes and displays these messages over the COM connection:
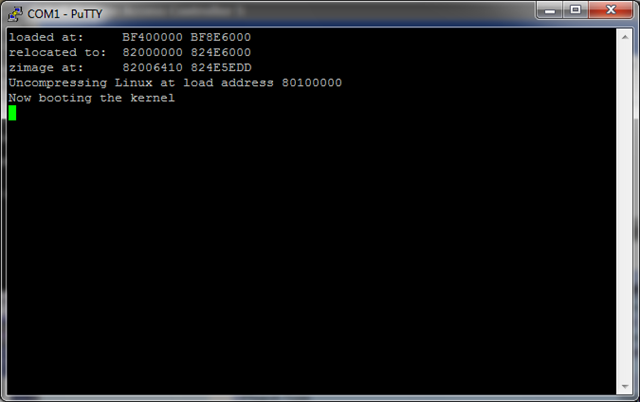
Now that I see that, it occurs to me that there may have been some other messages available before the recovery, perhaps indicating what was wrong, if I had only known to connect the COM port before. Next time…
Hi Mark,
Thanks for your post – I had the exact same problem and followed your steps exactly and got it working again. I was very lucky a colleague managed to find a null modem cable as I’m halfway across the world from the datacentre.
I can’t really add anything to your post except that I’ve got ESXi installed with the Dell OpenManage so instead of changing the IP address from BIOS I was able to change it from the OpenManage Server Administrator page (which saved me having to ask my colleage to change the address).
The IP address automatically assigned to the DRAC was 192.168.0.120 – I wonder if an address from this range is always assigned. It could help someone else who needs to change their IP address (configure a server on the 192.168.0.x range and scan for IP addresses)?
I also didn’t see the original recovery messages. Only read your last paragraph after starting the update.
Thanks again, Michael
Glad this helped someone. I’ve added a note in the article to check for status messages before starting the flash process.
I had the same error message, but got it fixed by updating the BMC. It also fixed the fans on 100% problem that I had.
Thanks Mark for this post, it worked perfect for me in a PoweEdge 1950.
There is a newer fw version in DELL’s web site.
Pablo
Man, you just saved my day.
those morons from dELL, they keept me on the phone for ~40 minutes and give me NO SOLUTION !!!
just… to replece the DRAC 5
First of all, thanks for posting this solution. Unfortunately, I don’t have a unix system. I tried using Solarwind Free TFTP server on windows but every time I tried the fwupdate it gives me the following
ERROR:Cannot load update file, Please Check:
1) Is TFTP server running
2) Did you enter the correct -a
3) Is the TFTP server path pointing to the update image file.
Do you have a tftp server that can be accessed from public?
Thank you.
Oops, nevermind. I installed the tftp server on a server. I guess that server blocked some ports. I installed on a windows 7 and it’s transferring now. Thanks Mark. You’re awesome.
Thank you! Worked great. I got some programming errors when using the latest firmware image from Dell’s support site, but it still worked fine upon completion.
We found your Blog helpful, thanks!
Another DRAC saved by your post. Thank you!
Dell 1950 revived with this method! Thanks!
This blog post was very helpful, thank you!
However, I was getting failures of the recover fwupdate command every time using tftpd or atfptd in Linux. It would start OK and say it was retrieving, then blow up 5 seconds later with an error and stop. The server logs show it starting the download twice, and not finishing.
Eventually, in desperation, I switched to the Tailsoft Quick TFTP Server pro for Windows (http://www.tallsoft.com/tftpserver.htm). It also timed out and died but eventually I found the magic setting.
Solution: You have to set the tftpd timeout nice and high so that the TFTP server does not retry before the DRAC is done processing the download. I set mine to a 120 second timeout (but based on how quick things finished I bet as high as 30 would be plenty). Then I retried my recover fwupgrade command and lo and behold it is working!
Now excuse me while I head back downstairs and do the happy unbricked hardware dance! !
Great tip Damien. I wonder if that was Chendra’s problem on 12/22/2011. What was the default timeout? Not sure why it worked on my Linux server and not yours, but it’s nice to have a Windows alternative anyway.
The option I set in Quick Tftp Server Pro was:
Choose Option->Setting in the menu, and in the Tftp tab, I set the value of Timeout (seconds) to 120.
I suspect this would work in aftpd in Linux too by setting the -r, –retry-timeout option (e.g. -r 120).
I also forgot to mention in my OP that Quick Tftp Sever Pro is shareware, you can use it for free but there is a delayed dialog at startup.
Another 2950 revived. Many thanks!
Didn’t help this s/hand device was previously factory initial still (1.0x I think)
Followed this article to the tee and it worked perfectly! THANK YOU!
one pe1950 drac saved, when the drac is in this initialization failure state there is another one of the two leds burning yellow, when the fw update succeeded they both seems to be green and the yellow has gone away! thanks again!
Excellent info thanks for taking the time to provide this fix.
Just wanted to let you know: Your article is still helping people, even after 5 years. I just resurrected the DRAC on an old PowerEdge 2900, thanks to you.
Thanks J.C.! Always gratifying to know that these articles are useful to others.
Your post is still valuable. Able to recover a DRAC5 in a Dell 1950 III from “initialization failure” following your instructions. I used IPSWITCH’s TFTP server on Windows 7 laptop that also was providing the Putty COM connection to the DELL serial port. The only issue I had was an TFTP firmware file download failure until on the IPSWITCH TFTP Advanced tab I enabled “Use Transfer window of size (pkts) to 1”. Then it went flawlessly. Thanks
Kerry, for a second I thought you meant the server was made in 1950! Feels that way sometimes :). Glad this helped and thanks for the additional suggestion on configuring TFTP.
Just dropped by to say thanks for sharing the info!
Scratched my head for a couple of hours my DRAC started to misbehave. Didn’t had LAN access to it but I got a serial connection thanks to you!
Took more to set the tftp as I forgot to open a port in the firewall on that box :))
Your info still valuable eight years later!
Hard to believe these old DRACs are still around and recoverable! Dell made some good iron…
Hi.
I’m completely unable to get into the recovery console.
I can see POST messages in Putty on my second laptop when connected via a serial cable but cannot actually do anything, I press enter and nothing happens.
Any thoughts?
@Someone, sounds like your DRAC may not need recovery. See the second-to-the-last paragraph in the article: “Once the DRAC was functioning again, it was no longer possible to get to the RAC Recover> prompt. Pressing Return in the Putty session had no effect.”
So what do I do then? My iDrac isn’t initializing, and I can’t flash it again through the OS. Is there some other way to put it in recovery mode so I can flash iDrac? I have the “IPMI drive disabled” error in windows when I try, I can’t even install a BIOS update or the OS Deployment drivers because of it. I have a yellow mark against it in device manager but can’t get rid of it.
I think what I did try to update before this failed was the lifecycle controller with iDrac package because in POST it was telling me that the firmware was out of date (or expired, can’t remember).
So maybe it’s just my LC firmware that’s bricked and not iDrac?
I’m not familiar with iDrac. This article was about a discrete, physical DRAC 5 card in a PowerEdge 2900. In your case, I think I’d go back to the source: check the README to see if the recovery instructions are the same. Maybe call Dell support. Re. BIOS update, if the iDrac is a separate card and its presence is hampering your access to the BIOS, remove the card temporarily.
Sadly iDrac is built-in. I managed to update the BIOS, so that’s all fine. I just can’t get to the recovery console…
Thanks for trying to help!
(server is out of warranty)
Back when I was dealing with this, Dell server support would talk to you even if the machine was out of warranty… Seems like there was a department that specialized in management tools that was quite good.
Yes, and in the release notes there was nothing about needing to incrementally update so as to not brick it, so, despite reading everything on the downloads page, there was nothing to suggest that going straight for the latest would brick it.
I complained to them and said that other manufacturers like Draytek for example say “if your firmware version is older than x.x.x upgrade to version y.y.y. first and then go to the latest”, but they aren’t mentioning anything about that at all.
thank you very much for this post. following these instructions 10 years later, and i got the drac-5-board’s solid amber light switch back to blinking green and now it works again :)
@Hadi – Amazing! Glad you’re back in the blinking green world again!