I blogged five years ago about setting up guest wireless with Tomato. For that, I just plugged a separate switch into a router port dedicated to the wireless VLAN. Worked great. But now I need separate VLANs for access points, phones, and cameras connected one 24-port PoE switch, i.e. one router port must pass traffic for multiple VLANs. Here’s how I set that up.
I’m running a Shibby build, Tomato Firmware 1.28.0000 MIPSR2-132 K26 Max, on a Linksys E3000. This build allows up to 15 VLANs but only four LANs, and since I want a separate IP address range for each VLAN, four was the limit, exactly what I needed.
I’m using a Cisco SF200-24FP Smart Switch. Nice as a PoE switch since all ports support PoE for a total of 180 watts. I would think these instructions should work on any Cisco 200 Series Smart Switch, but I haven’t tried others.
I used this article and this one for reference.
Set Up Tomato for VLANs
Under Basic > Network, set up the LANs you need with a separate IP range for each (assuming you are using Tomato as your DHCP server):
I’m going to use router port 3 for the “combined” VLANs. I had trouble with custom VLAN number and in the end, I put WAN on VLAN 15 then used VLANs 1-4 for my VLANs, with VLAN 1 as the default. Set this up under Advanced > VLAN:
Apparently the “Cisco way” to create a trunk is for the default VLAN to be untagged. However the Tomato GUI will not let you do this, so you need to log in to your router using SSH and use these commands:
nvram show | grep vlan1ports
returns “vlan1ports=2t 3 4 8*”. Copy that line to a set command, removing the “t”.nvram set vlan1ports="2 3 4 8*"nvram show | grep vlan1ports
returns vlan1ports=2 3 4 8*nvram commitreboot
After that, you should see that VLAN 1 is included in port 3 but not tagged:

Note I this it was this article and its link back to this article that tipped me off about untagging the port.
By default VLANs can’t see each other. If you want to be able to access your PoE devices from your (trusted, secure) main LAN, you can go to Advanced > LAN Access to set that up:
You can also set up access the other way, optionally restricting by IP address, e.g. if a DVR computer on the camera VLAN needs to be able send backups to a server on the main LAN.
Set Up the Cisco Switch
Under VLAN Management > VLAN Settings, define the three new VLANs:
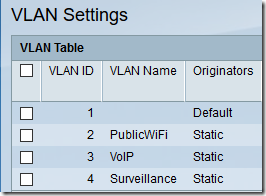
Plan out (write down) which ports should be on which VLAN. This switch has 24 10/100 ports and two gigabit ports. I want ports 1-7 on VLAN 2, ports 8-14 on VLAN 3, ports 15-24 and GE1 on VLAN 4 and port GE2 to be trunk to plug into the router. Note that I’m not using this switch for any access by VLAN 1 other than the trunk, but you could certainly set up a switch to also have some VLAN 1 ports. Also, as an aside, I’m using gigabit port GE1 on the camera VLAN for the DVR computer, since it receives streams from several cameras at once.
Although not required, I’ve found it very helpful to go to Port Management > Port Settings and fill in the Description field for each port that is in use. This allows quickly identifying a camera or phone when I need to turn its power off and back on.
Use the VLAN Management > Interface Settings screen to set VLAN Mode on ports 1-24 and GE1 to Access. Set port GE2 to Trunk. Use the Copy Settings button to copy settings from one port to a range of ports.
Use the VLAN Management > Port to VLAN screen to set up each VLAN one by one, identifying which ports are as Untagged, which are Tagged (only 2, 3, and 4 on the trunk in my case), and which are Excluded.
When you’re done, you can see a summary of all settings under VLAN Management > Port VLAN Membership. On this screen, U = Untagged, T = Tagged, P = Port VLAN ID (PVID):
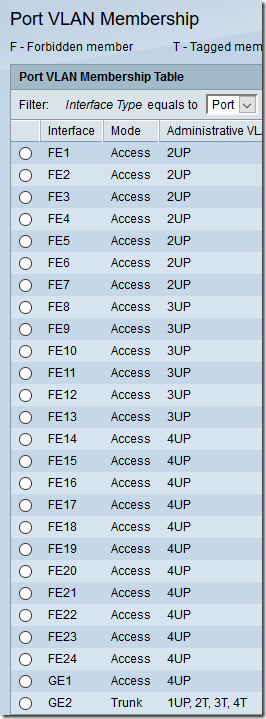
Note that the trunk setup matches the router: default VLAN 1 is untagged; VLANs 2, 3, and 4 are tagged.
Plug port 3 of the router into port GE2 of the switch. You should now be able to plug a laptop into various ports on the switch and confirm that you are getting IPs in the correct range. Also test that access from the main LAN to the VLANs works but not vice-versa.
Update May 23, 2017 – Add a Second POE Switch
Now I need to add a second, 8-port POE switch to the same network. I’m using a Cisco SG200-08P with four POE ports and four non-POE ports. I want port 1 to handle a WiFi access point, ports 2-4 to handle surveillance cameras, ports 5-7 to be on the default VLAN 1, and port 8 to be the uplink (trunk) port.
Set up Tomato
On the Tomato router, I followed a procedure similar to the above to allow port 4 to connect to the new switch. Note that I first had to revert the NVRAM change to be able to set up the tagged VLANs for port 4.
Before updating the UI:
nvram set vlan1ports="2t 3 4 8*"
After updating the UI:
nvram set vlan1ports="1 2 3 4 8*"nvram show | grep vlan1portsnvram commitreboot
Result:
Set Up the 8-Port Cisco Switch
Although in the same product family, the SG200-08P with the latest firmware (1.0.8.3) has a somewhat different UI than the SG200-24FP configured above.
Under VLAN Management > Create VLAN, adding VLANs 2-4 was very similar.
Oddly, under VLAN Management > Interface Settings, when you set the VLAN Mode to Access, the Frame Type is forced to Admit Untagged Only. (On the SF200-24FP, it is set to Admit All.) However I think this will work, as we are not expecting the devices themselves to tag any packets:
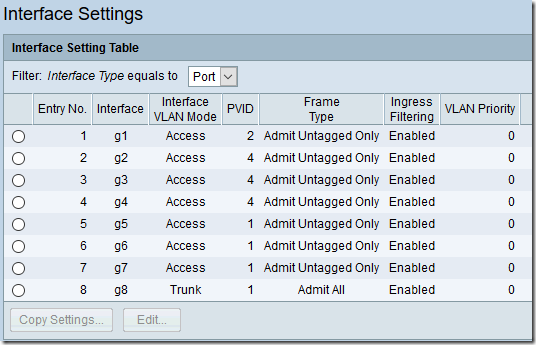
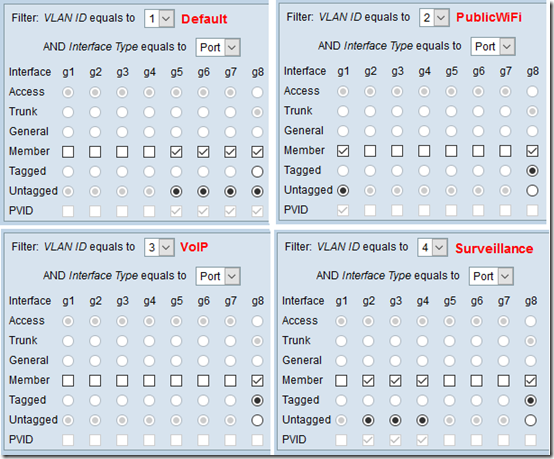
The VLAN Management > Port To VLAN screen is quite different. Here are the settings for all four VLANs:
The summary under VLAN Management > Port VLAN Membership looks like this:
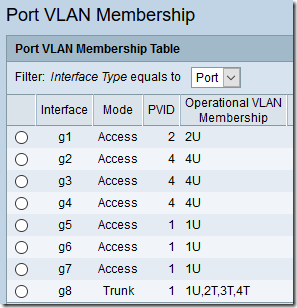
The layout here is also a bit different from the SF200-24FP. As before, U = Untagged and T = Tagged, but the Port VLAN ID (PVID) is explicitly listed.
Unfortunately, the SG200-08P does not have a Description field under Port Management > Port Settings, so you’ll have to keep track separately of which port is used for which device.


I am trying to set up my trunk VLAN on my switch. I have setup my VLANs as VLAN5, VLAN10, VLAN15 and VLAN20 on my pfSense box. Prior to trying to use my R7000 running Tomato, I used a TL-Link WA901ND which allowed for 4 SSID and I could setup the VLAN with the appropriate VLAN ID and trunk that into my switch and it worked well.
The problem that I am having in switching to my R7000 is that br0 is setup to be VLAN 01. That seems to be a problem across the board since I most of my switches want to use VLAN 1 as the default VLAN. I would like to change the br0 VLAN ID to 5, and that would be in-line with how I have been setting up my VLAN. So, can I change the VLAN ID to 5 or am I looking at factory resetting my R7000 for the 100th time?
Actually, it does seem like I am going to have to do the Factor Reset for the 101th time. In the VLAN section on my Tomato, I make br1 (VLAN10), br2 (VLAN15) and br3 (VLAN20) made all tagged on port 1. Apparently, not the best way to do that, since after rebooting, I am no longer able to access or even ping the device. I really thought this would be a small task and I could move onto other things, but no such luck!
K. Callis, I feel your pain–tech stuff invariably takes way longer than expected! I vaguely remember that I wanted to use VLAN IDs 10, 20, 30 on Tomato but somehow that didn’t work so I went back to 1, 2, 3, leaving 1 as the default. I think there’s a way on the 24-port Cisco switch to change the default VLAN, but at some point I decided, why fight the default.
Remember if you require tagged packets, it won’t “see” untagged packets, hence the command-line stuff near the top of this article (before the third screen shot) about forcing Tomato to treat default VLAN 1 as untagged.