A Cisco 1130AG access point died. Model AIR-LAP1131AG-A-K9. Bought a replacement on eBay. The eBay one was running the Lightweight Access Protocol (LWAPP). Here’s how I got it back to Autonomous Mode so I could configure it.
Get IOS Firmware from Another Access Point
Cisco only provides firmware images to customers with contracts. However you can copy an image from a known good access point. With credit to prasanna’s July 23, 2014 post in this thread (and later I found this Cisco article):
1. Set up a TFTP server on a PC that is local to a known good access point. Make sure the machine’s firewall is open (UDP 69). See notes on TFTP servers at the end of this article.
2. Log on to the good access point using SSH (e.g. with Putty). If your prompt ends in “>”, enter enable to get into privileged EXEC mode (“#” prompt). Run sh version to get the name of the current software. Then upload the firmware to the TFTP server using this command (substitute your software file name and you TFTP server’s IP address):
archive upload-sw tftp://<server IP>/c1130-k9w7-mx.124-21a.JY.tar
Load the Firmware onto the New Access Point
Important See notes below on which TFTP server to use.
1. On your TFTP server, rename the file to c1130-k9w7-tar.default.
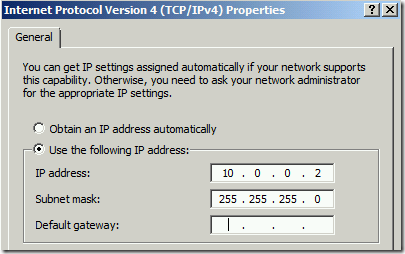
2. Change the IP address of your TFTP server to 10.0.0.2. You can leave the gateway blank.

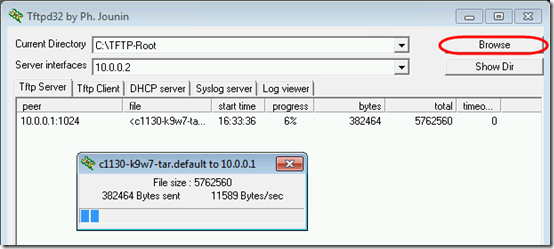
3. Start the TFTP server and make sure it is pointing to the correct folder and listening on 10.0.0.2.
4. Unplug the AP. Press and hold the AP’s Mode button with a paperclip while plugging the AP back in. Hold the button pressed for about 20 seconds until the right-hand Radio LED turns red.
If you have a console interface, you can see the AP start loading the image. But even if you don’t, watch the TFTP server to make sure it downloads it, which takes about five minutes. When the download finishes, the access point will reboot and should be in autonomous mode (assuming that’s the mode your source AP is in).
One of the articles says that the firmware reload does not change settings, but I had already done a factory reset (see below), so at this point I was able to access the AP’s web interface as well as use config t from the CLI. (Use Telnet to get to the CLI; SSH is disabled by default.)
4. Change your server’s IP address back to whatever it was before step 2.
TFTP Servers
I’ve always had good luck in the past with the Solarwinds TFTP server, and it worked for capturing the image (first part above), but I could not get the new access point to download the image from a Solarwinds TFTP server : it would try for a few seconds, then give up with this message in the console: “Image is not a valid IOS image archive.” Solarwinds TFTP eventually closed the connection after some time of inactivity.
In one of the threads, a Cisco rep had recommended tftpd32, specifically the v3.33 .exe setup program from April 19, 2009. That worked the first time. Important: click Browse to change to the folder containing your files!
Factory Reset
From this Cisco page:
1. Disconnect power (the power jack for external power or the Ethernet cable for in-line power) from the access point.
2. Press and hold the MODE button while you reconnect power to the access point.
3. Hold the MODE button until the [left-hand] Ethernet LED turns an amber color (approximately 2 to 3 seconds), and release the button.
Note It takes about a minute and 50 seconds for the access point to cold boot. The left-hand Ethernet LED will be flashing green. No point in trying to connect via web or Telnet before then.
Note The default username is Cisco and the default password is Cisco. The username and password are case sensitive.

