So you’ve used Windows Server 2008 bare metal restore and it wiped out your Dell Utility Partition. What to do?
Background: I’m setting up a Windows Server 2008 R2 machine as a Hyper-V host on a Dell PowerEdge 2900. I originally configured two RAID arrays (0 and 5). Starting with the Dell Systems Build and Update DVD and the companion Windows OS install support pack (required for Server 2008), I created the Dell system utility partition and installed Windows Server 2008 R2.
Later I decided that I wanted to try a single RAID 10 configuration. So under Windows Server 2008 R2, I used the native Windows Server Backup utility to create a backup with all the components required for a bare metal restore. Then I used the RAID BIOS environment to wipe out the old RAID configuration and create my RAID 10. Finally I restored the server by inserting the Server 2008 R2 installation DVD and doing a bare metal restore.
Empty System Utility Partition
That worked great, except… because I had wiped out the old disk configuration, and because Windows Server Backup doesn’t see the (hidden) Dell system utility partition, that partition was created, but not restored. Here’s the view in Disk Management after the restore:

In another test, I started the process from the Systems Build and Update DVD again. It wiped out all the partitions, re-created the Utility Partition, then asked for the Server 2008 R2 DVD. After I put that in, I got the “Install Now” button but there was no Repair option, so I couldn’t re-do my bare metal recovery. I had to reboot directly to the Server 2008 R2 DVD to get to the Repair option and do the bare metal recovery. Since the Dell Systems Build DVD wiped out all the partitions, I had to let Windows Restore re-create the partitions so it would have a place to restore Windows. That is, I had to leave “Format and repartition disks” checked. When it does that, guess what, it wipes out all the partitions (basically re-creating the MBR record from the backup), so the Dell Utility Partition is gone again. Possibly I could have unchecked “Format and repartition disks” and manually created partitions from the WinPE command line, but what if I don’t know the exact partition sizes for the Windows restore?
Can’t Fix from within Windows
Okay so I have an empty 32MB partition that is already set to type “DE” (Dell Utility Partition). Really all I need to do is get the Utility Partition contents back onto this pre-allocated but empty partition, right?
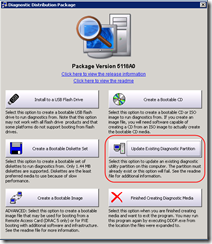
My first thought was to run this 32 Bit Diagnostics program, which includes an option to Update Existing Diagnostic Partition:
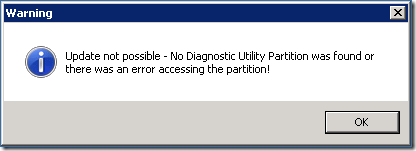
Unfortunately that gave the message “Update not possible – No Diagnostic Utility Partition was found or there was an error accessing the partition!”

Later I came to understand that the utility partition is set up with a custom boot sector, which the above utility probably does not recreate.
I thought maybe I could manipulate the partition under Windows, but I found that I could not even see the volume on the system utility partition from inside Windows. I blogged about that here: Diskpart Does Not See Volumes on OEM Partitions. I realized that I needed to be working in a WinPE environment.
UPINIT to the Rescue
Googling around, I came across the documentation on UPINIT, part of the Dell OpenManage Deployment Toolkit. This little 29MB download contains almost everything you need to populate a utility partition that was created when you did a Server 2008 bare metal restore.
UPINIT (Utility Partition Initialization) is a script that creates and populates the utility partition from an “image” (which in this case is really just a zip file renamed to have a .bin extension).
The UPINIT documentation says that it “ensures that no partitions are present on the target disk.” However by examining the UPINIT.BAT batch file, it looks like that only applies if you are not using the –overwrite parameter. If you ask it to overwrite, and it finds the utility partition, it should format it, set up the boot sector, and copy the image, without disrupting your other partitions.
Warning UPINIT calls diskpart to manipulate the partitions on your disk. What’s the worst that could happen? You could lose all the data on all your partitions. Have a complete backup before using UPINIT.
I do have a full backup, and I’m in a pre-production environment, so I decided to give it a try.
64-Bit Unzip.exe
The one thing not included in the Deployment Toolkit is a 64-bit unzip.exe utility. I found that open-source InfoZip worked great:
ftp://ftp.info-zip.org/pub/infozip/win32/unz552xn-x64.exe
Note that unz552xn-x64.exe is a self-extracting archive which contains the unzip.exe file you will need. You can run the self-extraction on a 64-bit system, or you can just open the downloaded file in WinZip, for example, and extract the unzip.exe file.
Step-by-Step Instructions
The basic procedure is to get the Deployment Toolkit and unzip.exe onto a USB stick, then to access that from the WinPE environment created by the Windows Server 2008 R2 installation DVD. Here are the details:
- Download the Dell OpenManage Deployment Toolkit and extract it to the root of a USB key, e.g. E:\. If you’d like to read the toolkit documentation, see the E:\Dell\Docs folder for PDF files.
- Copy the 64-bit unzip.exe (see above) to E:\dell\x64\Toolkit\Template\Scripts.
- Insert the USB key into a USB port on your server.
- Boot your server from the Window Server 2008 installation DVD. This puts you in the WinPE environment. I’m using Server 2008 R2 but I think this would work on non-R2 as well.
- Confirm the locale by clicking Next. You should see the Install Now button. Don’t click it!
- Press Shift-F10 to open a command prompt. This is where you will do the rest of the work.
- Change drives and inspect directories until you find your USB stick. Mine wound up on drive H:.
- Change to this directory on the USB stick:
H:\dell\x64\Toolkit\Template\Scripts - Type notepad TKENVSET.BAT to edit the file.
- Find the DT_DRIVE line and change it to point to the letter assigned to the USB stick (H: in my case):
set DT_DRIVE=H: - Find the DT_PATH line and change it to read as follows (adding \x64 to the path):
set DT_PATH=%DT_DRIVE%\Dell\x64\Toolkit - Save the modified TKENVSET.BAT file.
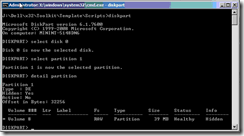
- Run diskpart to confirm the disk number of your empty utility partition. I know from running Disk Management under Windows (first picture above), that it should be Disk 0. Run these commands to double-check:
diskpart
select disk 0
select partition 1
detail partition
exit
You should see a 32MB RAW volume in the partition:

- Assuming you have the same 32MB partition that I do, and that it’s on Disk 0 like mine, run these two commands:
set UP_MOUNT=Z (This tells UPINIT to temporarily mount the utility partition on Z: rather than the default of H:, which is already in use)
upinit –disk=0 –size=32 –file=”H:\dell\x64\Toolkit\Systems\upimg.bin” –overwrite
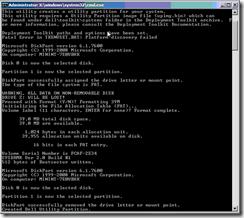
Early in the process, you will see the message, “Fatal error in TKENVSET.BAT: Platform discovery failed.” This goes back to a missing HAPI driver, but it turns out that it is not needed for this process, so ignore that error. When the process completes, your screen should look like this, with the “Created Dell Utility Partition” message at the bottom:

- Time to test! Reboot the machine and press F10 during the system initialization. The system should boot into the utility partition with this brief menu:

From this point you can run the text-mode hardware and memory diagnostics.
MBR Patch Skipped
The one thing I was nervous about is that the UPINIT does not patch the MBR when the utility partition already exists (see line 271 of UPINIT.BAT). I have no idea what the sysdrmk 0 MBR command does, but fortunately it seems it was not needed in this case.
Conclusion
It seems like Dell could create a simple bootable CD (WinPE or Linux) that would reload the contents of an empty system partition after a Windows 2008 bare metal restore. Until they do, at least this workaround is available. Did it work for you?


I have found it necessary to go through this procedure after having purchased a Dell PowerEdge 2900 (Refurbished) server which came with NO CDs and someone had apparently wiped out the Dell Utility partition.
A couple corrections I would like to add to your step-by-step, perhaps due to updates from Dell:
First of all, a step needs to be added between 13 and 14, mentioning that you need to exit the diskpart command line utility. Otherwise, you’ll get an error when you try to run the set UP_MOUNT=Z command. Simply type “exit” to leave the diskpart utility and proceed to step 14. I realize this may go without saying for the more technically inclined, but is an important part of the procedure.
Secondly, and this is perhaps where Dell may have updated something in their OpenManage Deployment Toolkit, if you run the command upinit –disk=0 –size=32 –file=”H:dellx64ToolkitSystemsupimg.bin” –overwrite exactly as it is written, it will not work. The correct syntax is:
upinit -–disk=0 -–size=32 -–file=”H:dellx64ToolkitSystemsupimg.bin” -–overwrite
Note the double dashes. Subsequently, this should work as well, with single dashes:
upinit –d=0 –s=32 –f=”H:dellx64ToolkitSystemsupimg.bin” –o
Just thought I’d share. Thanks so much for the step-by-step! It works! At least it did for me!
Thanks for those comments. Note that if you are starting with a bare server, you can create the utility partition by booting from the standard Dell Systems Build and Update DVD, which will then prompt you for the operating system DVD of your choice. The long procedure in this article only became necessary when I wanted to do a bare metal restore using a Microsoft backup.
Hello there,
Firstly, thanks for your useful post Mark.
I followed your step, but with the v4.0 of Dell OpenManage Deployment Toolkit, and I took in account the advices of Dennis St. John, all went good until the execution of upinit.
In my case, I’ve created manually a 40 Mb RAW partition on the same disk as others partitions (system drive, etc..) and the fact is, I spotted the partition to fill on the disk 1 and the partition 3 (with diskpart).
When I run the command line :
upinit -–disk=1 -–size=40 -–file=”C:dellx64ToolkitSystemsupimg.bin” -–overwrite
I’ve got the following error, briefly :
“Can’t create a Dell Utility Partition on Disk 1, delete all existing partitions before”
On your post I saw you have got several partitions on your disk 0, so I don’t get why this error occur ? Thanks in advance, if you got an advice or a suggestion.
Regards,
Alex
Alex, I’m thinking that the Dell partition must be the first partition on the main boot disk. And I think it has to be type DE (which I probably checked using BootIT NG), which shows up as an OEM Partition in Disk Manager and RAW in diskpart. I doubt that creating a RAW partition at the end of the disk will work. In other words, UPINIT probably wants to put the utility data in Disk 0 Partition 1, and that partition must be type DE.
In my case, the partition was created automatically when Windows restored the disk structure. The above procedure is about filling in that partition with the diagnostics.
It’s questionable whether it is worth all this effort. I’m not sure I’ve used that partition in the three years since I wrote this article. You can always boot from a diagnostics CD.
Ok thanks for enlighten the purpose, I am in a real deep mess over here, because I want to recreate this partition in order to achieve a complete backup of my Active Directory from a physical server to another one.
On the origin server, there is this OEM partition, and all partitions are MBR type, so I had to install Win2k8 R2 from the BIOS, in order to get my MBR partitions as well, and not from the UEFI of Dell. I guess it’s why this partition wasn’t created.
And then, when I try to restore is with a Simplified Disaster Recovery with Backup Exec, it fails because when comparing the two disks, this partition is not matching.
Here is for the story, but I’m driving away from the subject. I contacted a Dell technician who said me that the utility partition can be set from the OpenManage v7.2 disk. I reinstalled my OS throuht the utility wizard, and there was not option to add this partition, as he told me.
I found some useful infos about this DE partition, which is actually a slightly customized FAT16 filesystem. I’ll got this way, and continue to harrass Symantec support as well, ’cause they keep sending me technote links that I’ve already read 10 times.
That is a bit of a mess! I am surprised that the Dell wizard didn’t give you the option of creating the system partition, or perhaps created it without asking, but I haven’t used that approach in quite a while.
Restoring AD should have nothing to do with the Dell utility partition. Is that some Backup Exec requirement?
You might be able to manually create the partitions using a non-Windows tool, e.g. BootIT NG or PartImage. Maybe that would fool Backup Exec into allowing you to do the restore.
I also haven’t used UEFI and I stopped using Backup Exec years ago. I just use the standard Windows Server Backup to make a full image backup of the server, then use the Windows install disk to re-format the disk and restore. Windows Server Backup does support restoring to dissimilar hardware, though you might have to tweak some things. For example, here is an article about my disaster recovery test, restoring a virtual instance of Server 2008R2 to a physical desktop machine:
https://www.mcbsys.com/blog/2013/04/restore-a-hyper-v-server-to-an-optiplex-960-take-3/
Hi Mark,
Thanks for the precious help, I went in another way at the moment, and if it don’t work, I will try to manually create the partition, in order to, as you said, try to fool BE (if there is free space enough, and the same file system, I guess it should be alright, as BE recognize this DE type).
I’ll let you know if my further try succeed.
Have a nice day !